Sometimes the best way to grow as a producer is to step back and let someone else take the wheel. That's exactly what happened when Oscar Underdog visited my Berlin studio during Atonal festival.
Last time I was on his channel, I showed him some tricks and tools from my workflow. This time, we switched roles completely – and it was fascinating how he reminded me of techniques I'd either forgotten about or never explored deeply enough.

The Beauty of Fresh Perspectives
You know that feeling when you've been using the same tools for years, but you only scratch the surface? That was me with Ableton's Shifter device. I'd occasionally dabble with the ring modulation, remembering my hardware days with the Eurorack system, but I never really understood what I was working with.
Oscar changed that in about five minutes.
Tool 1: Steps
The first thing Oscar showed me wasn't even a stock Ableton device – it's a free Max for Live tool called Steps that you can grab from elephant.io. But here's what makes it so good: it looks so native to Ableton and is the perfect DFAM Sequencer for modulation.
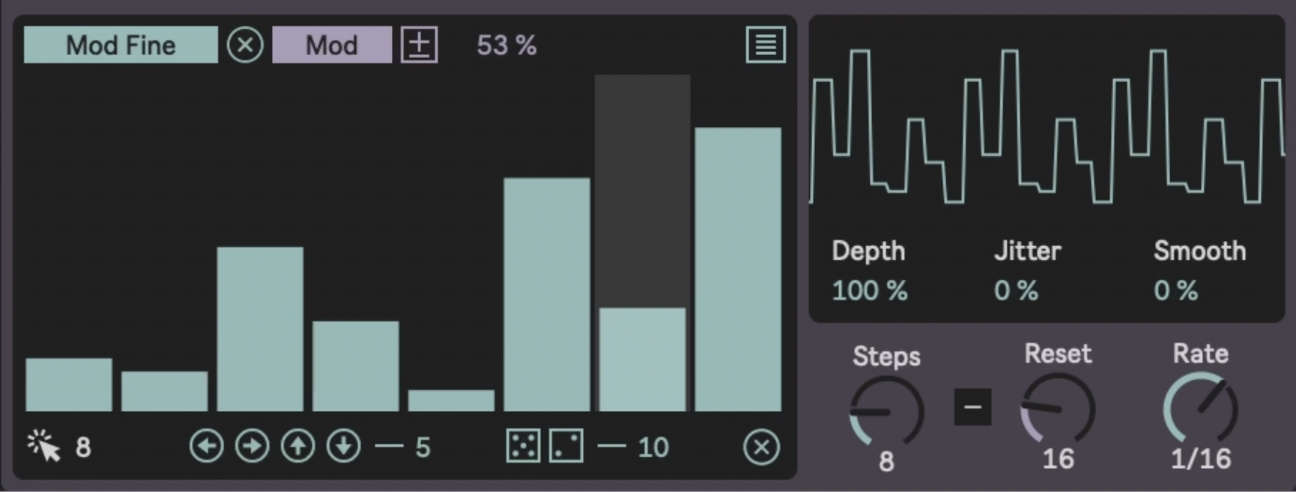
Now, I've been using Module from the Fors pack (Dyad) for step sequencing, but seeing Steps in action reminded me how much a good GUI can change your workflow. The visual feedback is just so much clearer – you see exactly what's happening and can adjust on the fly.
Remember how I'm always talking about modulation being split between sound design (those quick 1/4 or 1/8 note movements for groove) and arrangement modulation (those slow 16-bar sweeps that make tracks evolve)? Steps handles both but could be even slower if you ask me.
It's basically the DFAM step sequencer I've always wanted inside Ableton. Eight steps (or more), that you can:
-
Randomize instantly
-
Shift left or right to find new sweet spots
-
Smooth out for gentler transitions
What I love most is how you can create polymeters easily. Set your drum pattern to one bar, but make your modulation seven steps. Suddenly nothing repeats exactly the same way – pure techno gold.
Tool 2: Shifter
This is where Oscar really reminded me of possibilities I'd been ignoring. I knew Shifter existed and would use the ring mod occasionally, but I'd never explored its full potential for sound coloring.
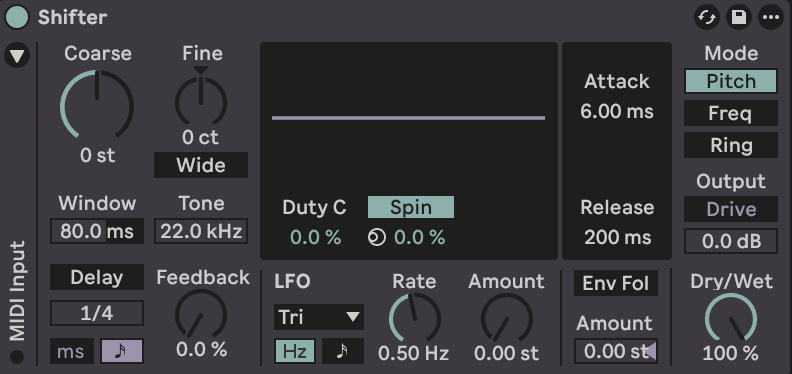
Turns out, it's actually three completely different tools in one:
-
Pitch Mode: Respects music theory. Multiply frequencies by two, you get an octave higher. Everything stays harmonic and musical.
-
Frequency Mode: Ignores music theory completely. Add 50Hz to every frequency and watch everything become beautifully inharmonic. This is where you find those sweet spots that make modular synthesizers so addictive.
-
Ring Modulation: Takes one frequency and splits it into two sidebands. Play a 500Hz sine wave, and suddenly you're hearing 400Hz and 600Hz instead. The more you push it, the more metallic and dissonant it becomes.
But here's what I'll definitely be using more: Shifter has its own delay and LFO built in. While I usually reach for separate effects, this session reminded me that sometimes the solution is right there inside the device you're already using. Now when I want to color a sound and add movement, Shifter will be much more in my mind as a first choice.
Tool 3: The Haas Effect
You know how I'm always trying to keep things stock and accessible? Oscar showed me the cleanest way to create width using just Ableton's delay.

The Haas effect tricks your brain into thinking a mono sound is coming from the sides by playing it slightly delayed in one ear. Here's the formula:
-
Add a delay
-
Make it 100% wet
-
Turn off sync
-
Set one side to 1ms, the other to about 8ms
-
Make sure there's no feedback
Suddenly your centered sound is sitting wide in the sides, but it still feels like one cohesive element. It's perfect for creating that complementary balance between center-focused elements and wide atmospheric parts in dense arrangements.
The Power of Producing Together
What struck me most about this session was being reminded of how different producers approach the same tools. We all have access to the same devices in Ableton, but everyone develops their own relationship with them, their own techniques, their own way of finding sweet spots.
This is exactly why I believe producing together is the fastest and most fun way to learn. When you sit with another artist and watch their workflow, you don't just pick up new techniques – you get reminded of possibilities you'd forgotten or never fully explored.
I'll definitely be switching from Module to Steps for that better GUI, and frequency shifting will be much more present in my sound design toolkit now. Not because these tools are revolutionary, but because seeing them through Oscar's eyes reminded me what I was missing.
The Real Value of Collaboration
This collaboration reminded me why I love producing with other artists so much. Every producer has developed their own relationship with the tools, their own secret techniques, their own workflow patterns. When we share that knowledge openly – no gatekeeping, no competition – everyone benefits.
Oscar's teaching approach is something I really respect. He doesn't just show you what to click – he explains the reasoning behind each decision. That's how you actually learn, not just copy.
If you haven't checked out his YouTube channel yet, definitely dive in. And if you want to go deeper, he offers comprehensive courses through his music school that break down complex concepts in that same clear, approachable way.
The biggest takeaway for me? Sometimes the tools you need are already right there in your DAW. Sometimes you just need another set of eyes to remind you what you've been overlooking.
Want to explore more modulation techniques and workflow ideas? Check out my preset packs and Templates for sound design journey.